

Celeste Madeline Amigurumi

A few notes before we begin
-While creating this amigurumi you will work in continuous rounds, unless told otherwise.
-When I am creating an amigurumi based on a certain character I like to look at reference pictures of the character I am creating. It really helps when assembling the pieces and making the facial features!
-Your finished amigurumi should measure about 14 inches tall, depending on yarn type and tension.
ª
I DID NOT CREATE THIS CHARACTER. Celeste and Madeline IS COPYRIGHT OF Matt Makes Games. THIS PATTERN IS NOT AFFILIATED WITH, ENDORSED BY, OR SPONSORED BY Matt Makes Games. THIS PATTERN IS NOT BRANDED AS ANYTHING AFFILIATED WITH SAID FRANCHISE.
ª
YOU MAY NOT CLAIM THIS PATTERN AS YOUR OWN. YOU MAY NOT REPRINT OR SELL THIS PATTERN.
ª
IF YOU USE THIS PATTERN I ASK THAT YOU PLEASE GIVE ME CREDIT AS THE ORIGINAL DESIGNER AND LINK THE PATTERN BACK TO ME.
ª
FEEL FREE TO MAKE CHANGES OR ADAPT THIS PATTERN AS YOU SEE FIT. AFTER ALL, THIS IS YOUR CREATION! BUT PLEASE, AS STATED ABOVE, GIVE ME CREDIT FOR THE ORIGINAL amigurumi design.
Materials Needed
o G Hook (4.0mm crochet hook)
o Light Blue Yarn
o Orange Yarn
o Dark Purple Yarn
o Buff (Flesh toned) Yarn
o Black Yarn
o Optional Strawberry needs: Green, Red, and Yellow yarn
o Craft felt in the following colors: Black, White, Orange, Red, Pink
o Stem Wire no thinner than 22 gauge
o Hot glue/ tacky glue. (Optional: instead of glue you can use a felting needle for facial features)
o Fiber Fil stuffing
o Scissors
o Yarn Needle for sewing
Abbreviations
SC = Single Crochet
INC = Increase (2 SC in one)
HDC= Half double crochet
DEC = invisible decrease
Sl St = Slip Stitch
F/O = Finish off.
Head
Use Buff. Stuff as you go.
Round 1) 6 Sc in Magic Ring (6)
Round 2) INC around (12)
Round 3) [1 SC, INC] repeat 6 times (18)
Round 4) [2 SC, INC]repeat 6 times (24)
Round 5) [3 SC, INC] repeat 6 times (30)
Round 6) [4 SC, INC] repeat 6 times (36)
Round 7) SC around (36)
Round 8) - Round 13) SC around (36)
Round 14) [1 SC, INC] repeat 7 times, 1 SC (43)
Round 15) SC around (43)
Round 16) [4 SC, DEC]; repeat 7 times, SC (36)
Round 17) [3 SC, DEC]; repeat 7 times, SC (29)
Round 18) [2 SC, DEC]; repeat 7 times, SC (22)
Round 19) [1 SC, DEC]; repeat 7 times, SC (15)
Round 20) DEC 7 times, SC (8)
Finish with a slip stitch. Do not close off. Finish stuffing the head. Note that the side of the head with the increases at round 14 is the front side of the head.
Hair Cap
Use Orange/Carrot.
Round 1)
6 SC in Magic Ring
Round 2)
INC around (12)
Round 3)
1 SC, INC; repeat 6 times (18)
Round 4)
2 Sc, INC; repeat 6 times (24)
Round 5)
3 SC, INC; repeat 6 times (30)
Round 6)
4 SC, INC; repeat 6 times (36)
Round 7)
SC around (36)
Round 8)
Sc around (36)
Round 9)
Sc around (36)
Finish off with a slip stitch.
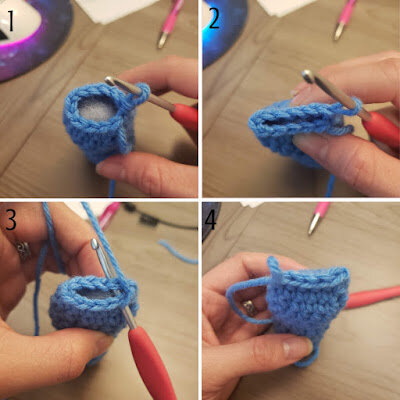
Legs
Use Dark Purple/Amethyst. Make two. Stuff as you go.
Chain 18. Join the ends with a slip stitch, then we will crochet in the round.
Round 1) SC around (18)
Round 2) – Round 13) SC around (18)
Finish with a slip stitch. Leave both ends open and stuff.
Body
Continue with Dark Purple/Amethyst.
Insert your hook through both legs at any stitch. Join legs together by drawing up a slip stitch. Continue to crochet in the round around both legs. Place your stitch marker in the 1st SC you make, this will mark the end of the round.
Round 14) SC around (36)
Round 15) -Round 20) SC around (36)
Color change to Buff.
Round 21) SC around (36)
Round 22) 10 SC, DEC; repeat 3 times (33)
Round 23) -Round 26) SC around (33)
Round 27) 9 SC, DEC; repeat 3 times (30)
Round 28)– Round 33) SC around (30)
Round 34) 3 SC, DEC; repeat 6 times (24)
Round 35) 2 SC, DEC; repeat 6 times (18)
Round 36) 1 SC, DEC; repeat 6 times (12)
Round 37) SC around (12)
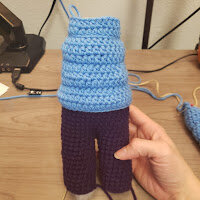
Jacket
Use Light Blue.
Chain 39. Leave a long tail for sewing. Join ends of the chain with a slip stitch.
Round 1) HDC around (39)
Round 2) HDC around (39)
Round 3) HDC around (39)
Round 4) Sl St around (39)
Round 5) HDC around (39)
Round 6) 10 HDC, DEC; repeat 3 times (33)
Round 7) HDC around (33)
Round 8) Sl st around (33)
Round 9) 9 HDC, DEC; rep 3 times (30)
Round 10) HDC around (30)
Round 11) HDC around (30)
Round 12) Sl st around (30)
Round 13) 8 HDC, DEC; rep 3 times (27)
Round 14) HDC around (27)
Do 1 SC, then a slip stitch to finish off. Leave both ends open.
Arms
Start with buff. Make two arms. Stuff as you go.
Round 1) 6 SC in Magic Ring (6)
Round 2) INC around (12)
Round 3) Sc around (12)
Round 4) Sc around (12)
Round 5) Sc around (12)
Color change to Light Blue.
Round 6) 3 HDC, INC; rep 3 times (15)
Round 7) HDC around (15)
Round 8) HDC around (15)
Round 9) Sl st around (15)
Round 10) HDC around (15)
Round 11) HDC around (15)
Round 12) HDC around (15)
Round 13) Sl st around (15)
Round 14) HDC around (15)
Round 15) HDC around (15)
Round 16) HDC around (15)
Round 17) 3 SC, DEC; repeat around (12)
Round 18) SC around (12)
Fold the arm flat, place your hook through both sides then SC across the top to close off. Make sure to finish stuffing before you close. Only lightly stuff the top of the arm.
Feet
Use black. Make two. Stuff as you go.
Round 1) 6 SC in magic ring. (6)
Round 2)
INC around (12)
Round 3) 3 Sc, INC; rep 3 times (15)
Round 4)-Round 8) SC around (15)
Round 5) 3 SC, DEC; rep 3 times (12)
Round 6) DEC around (6)
Finish stuffing and close off.
Strawberry
Use red. Stuff as you go.
Round 1) 3 SC in magic ring (3)
Round 2) INC around (6)
Round 3) 1 SC, INC; rep 3 times (9)
Round 4) 2 Sc, INC; rep 3 times (12)
Round 5) 3 SC, INC; rep 3 times (15)
Round 6) 4 SC, INC; rep 3 times (18)
Round 7) SC around (18)
Round 8) 1 SC, DEC; rep 3 times (12)
Round 9) DEC around (6)
Finish stuffing then close off. Take a long strand of yellow yarn and run some random stitches through the strawberry with your yarn needle. This will make the little seeds on the strawberry.
Strawberry Leaves
Use green.
Round 1) SC 5 in magic ring (5)
Round 2) Chain 5, then working down the side of the chain, sl st, sl st, SC, HDC, then sl st into the next SC on the magic ring. Repeat this five times.
Assembly
1.
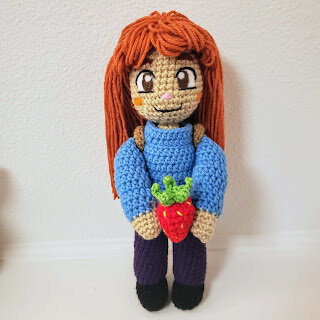
Slip the Jacket over the top half of the body. Use the tail to sew the bottom of the jacket to the body.
2.
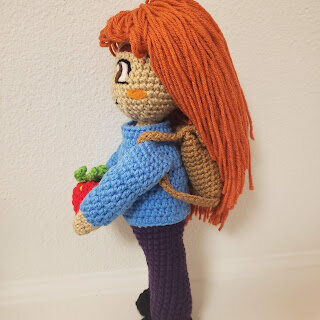
Sew the feet to the open-ended bottom of the legs. See finished pictures for reference.
3.
To support the head, take your wire and fold it in half. Insert the wire into the body through the opening at the top. Trim wire as needed so it doesn’t poke through the body. Leave a portion of the wire sticking out of the top for the head to fit over.
4.
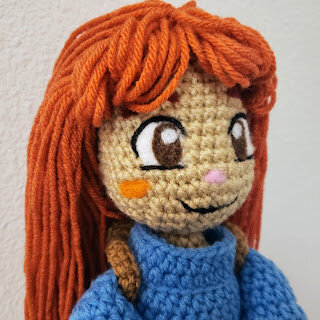
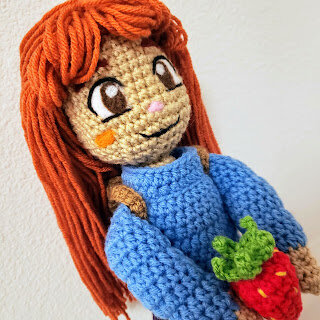
Sew the haircap onto the head. Don’t sew it directly onto the top of the head, place it slightly towards the back at an angle. Keep in mind that the side of the head with increases at round 14 is supposed to be the front side of the head.
5.
Sew the head onto the top of the body.
6.
Sew the arms to the side of the body. If you plan on using the strawberry, sew the arms at a forward reaching angle so she can hold the strawberry. See the finished photos for reference.
7.
Sew or glue the strawberry into place between the arms.
8.
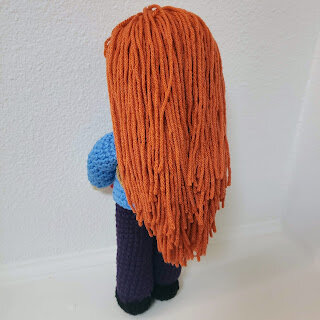
To give Madeline her hair you will root individual hairs to the hair cap. Cut long strands of orange yarn approximately 16 inches long. To root the hair, fold the strand in half, stick your hook through a stitch in the hair cap, grab the strand with the hook, pull through the stitch, yarn over and pull the strands through. See the pictures below for reference.
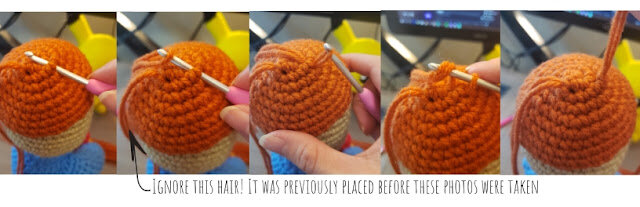
Be sure to make the hair toward the front of the head nice and thick!
9.
The last thing to do is to make the face. I would recommend looking at reference photos of Madeline’s face while doing this. It really helps to get the details and proportions correct.
For the face, I used a combination of craft felt and loose wool felt for her eyes, cheeks, and nose. All the details are needle felted on.
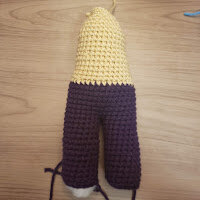
***NOTE: I did not include the pattern for the backpack as seen in the photos. Sorry!
All finished!
Thank you so much for checking out my pattern! I had a great time making Madeline and I hope you did too. If you notice any discrepancies in the pattern or have any questions about the pattern, let me know in the comments below.
I'd LOVE to see your work too!
Shout out to me on Twitter and Instagram
@1UPcrochet #1upcrochet
and show me pictures of your completed projects!